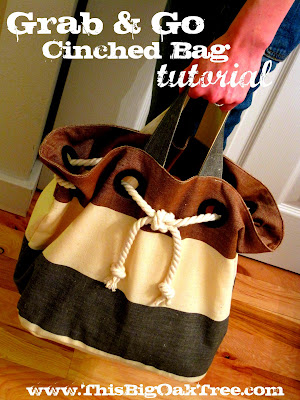
{Large Cinched Tote} Tutorial
With spring & summer lingering in our minds, dreaming of warm days lounging on the beach or under a shady tree...oh sorry I got a bit carried away there!
Well you know what's been on my mind! And that's precisely what got me inspired to make this oversized tote for all your summer luggin' (get it? summer lovin'?) I know, lame.

Here's what you'll need:
1/2 yard of main fabric (I bought mine at Fabricate)
1 yard coordinating fabric for liner
fabric scissors
thread
sewing machine
iron/ironing board
To purchase this fabric online click the link below:

The first thing you need to do is cut out the following:
From the main fabric cut:
2 main pieces- 21 1/2" x 18"
From the coordinating fabric cut:
2 straps- 3" x 26 1/2"
1 belt- 3" x 42"
2 liner pieces- 21 1/2 x 18"
2 bottom pieces- 21 1/2" x 6"

Using the 2 bottom pieces find the center along the 6" side, mark and measure out 5" inches on an angle (shown above). Repeat for second bottom piece.


Placing the main fabric piece right side up, lay one bottom piece centered on top of main fabric.
Pin it in place and stitch a 1/4" seam just along where the bottom piece edge touches the main fabric edge.

Once you have that stitch in place line up "A" and "B" edges (see previous image), pin & stitch.

Just another shot of the step mentioned above.

Next lay the other main piece right side up. Lay the other right side down on top.
Line up the the bottom piece with the bottom piece laying on the table, pin & stitch.

Just another shot of the step explained above. Repeat matching "A" and "B" edges as described above.

Once you have the bottom on you'll need to pin the sides together and stitch a 1/4" seam up the sides. Repeat for other side.
To create liner repeat all previous steps using the
2 liner pieces- 21 1/2 x 19"
1 bottom piece- 21 1/2" x 6"

To make the straps iron in the sides 1/4".

Fold in half and iron again.

Stitch an 1/8" seam down both sides of the straps. Repeat for second strap.
Next put the liner, RIGHT SIDES TOGETHER, inside the main fabric tote lining up the side seams.

Once you have your marks on the fabric lift up the main fabric and lay the strap inside as shown below.

Pin the straps in place.

Pin the main fabric to the liner all the way around the top.
Leave a 5" opening between one set of the straps.


Iron down the liner around the top edge of the tote.

Iron down the opening.

Stitch the opening closed with an 1/8" seam and continue all the way around the top of the tote.

If you don't want to add the cinch you can stop here.
To add the cinching continue on...

3" down from the top of the tote and 5" and 7" in, make a mark with a marker. Repeat for the other side on the front of the tote and for the back as well (8 button holes in total).

Refer to your machine's user manual for making button holes. I used the biggest possible button that my machine would take (approximately 1").


Using your seam ripper cut open the button holes.
PLACE A PIN ACROSS THE TOP OF THE BUTTON HOLE TO
PREVENT RIPPING STRAIGHT THROUGH.

To make the belt iron the sides in 1/2 each & the ends as well.

Fold in half and iron again.
Stitch an 1/8" seam down both sides.

Tie belt into a simple knot.
And there you have it!
Time to grab your flip flops and head for the beach!


Let me know if you have ANY questions!
If you want to purchase this fabric online click the link below to be taken directly to it on www.fabric.com.
Make sure you click this link to follow my blog!
You don't want to miss out on anything now do you?
Happy Crafting!


I seriously had no idea you were such a gifted seamstress. I love it!
ReplyDeleteThanks Taryn! I honestly didn't know I had it in me either! I guess it's not as hard as I always imagined it would be :)
DeleteSuper CUTE!!! I love it LOTS! Thanks for stopping by and leaving a sweet note! I'm SUPER EXCITED to know about your blog! It's so inspiring and I"m happy to be your newest follower! XO, Aimee
ReplyDeleteThanks Aimee! Ditto :)
DeleteThis is the cutest bag ever...can you make me one? LOL....thank YOU so much for correcting my spelling mistake...that darn spellchecker should check your titles too :D hehe!
ReplyDeletewww.imprintalish.blogspot.com
Love your blog too..new follower ;)
No problem ;) My mom caught one of mine once...thank goodness for moms! P.S. I "pinned" your light and it blew up!
DeleteHow cute and what a great tutorial...... ….I'd like to invite you to share this @CountryMommaCooks Saturday Link and Greet Party starts(Fri.6pm.ct-Sun.)…..have a wonderful day:)
ReplyDeleteThanks for the invite! I'll check it out for sure :)
DeleteVery cute bag! I love the cinching detail. Maybe all my stuff wouldn't fly it if I cinched it up. :) Come link up sometime to I Made It! Monday, if you'd like.
ReplyDeleteThis is so cute!! I love how easy you make it look to make! I am pinning this and hope to make it for summer! thanks for inspiring!
ReplyDeleteWhat kind of fabric did you use? This is so cute & just what I've been looking for to haul things back and forth to the house & office.
ReplyDeleteHi Mary, I'm so sorry I don't recall the name of the fabric but if you want to contact the lovely ladies at www.fabricateboulder.com and mention that you saw it on my blog I'm sure they could give you the name. They likely still have some too but I'm not sure if they ship if you're not in the area. I plan to visit them again soon so I'll ask myself then.
DeleteThank you for sharing. It is such an adorable and simple bag! I'm going to have to make one. :)
ReplyDeleteI love this bag!! Do you have any ideas as to making the bottom stiff instead of soft? If you wanted a hard bottom for the bag?
ReplyDeleteHi Jessica! Thanks for checking out my blog! I did consider doing a hard bottom. I suppose what you could do is create 3 of the bottom pieces and some cardboard cut in the same shape but about 1/4" to 1/2" smaller all around. Then sew the cardboard in between the 2 bottom pieces. Then sew the bottom on as directed. You would need to make sure that you leave a large enough hole when you sew the liner to the main fabric to where the cardboard bottom can be pulled through. Let me know if that doesn't make sense or if you have more questions!
DeleteThank you so much for this tutorial. The bag is super cute and I'm going to make one for my friend. I did notice, though, when I was cutting the pieces for the outer part, a half yard of fabric wasn't enough for the dimensions you posted, so I scaled mine down a little. Am I missing something?
ReplyDeleteHi Erika, Here's what I did. I bought 1/2 yard (which would have been 44" wide by 18" long)of the floral fabric and folded it short sides together. I see now that I did put "19"" so they must have miss cut it for me. I'll go fix that! Did it work out well when you scaled it? I apologize for that! Amy
DeleteThanks for the reply! It was fine. I dropped both sides by an inch and a half and it was fine. Definitely still big enough. :) just wanted to make sure I wasn't mismeasuring! I'm still very new to sewing.
DeleteI'm so glad it still worked out! How did you feel the tutorial was as far as being thorough enough to complete the project? I just want to make sure I'm doing a good job walking you through all the steps...
DeleteOk, I lied, I like this tutorial the best. I may have to whip one of these together. It would be perfect for my flight with my baby in June from NY to WA. Thank you for sharing all you awesome tutorials.
ReplyDeleteThanks for this tutorial! I made this over the weekend and I love it! However, the bottom of mine once turned right side out is kind of like bunchy on the corners. . .is this right or have I done something wrong? In the pictures yours doesn't look that way but there isn't a direct picture of the bottom so I wasn't sure. Again, thanks for this :)
ReplyDeleteHi! Thanks for checking out my blog and using one of my tutorials :) Mine may have done that a little bit but not much. Not enough where I thought it looked bad or wrong in some way. Did it turn out alright?
DeleteYes, it turned out great! I love it! Its not bad 'poochy' but I wanted to make sure a little was expected and not that I had done something wrong. I have a 5 year old who loves it too and she is wanting one as well so I am going to try to cut the pattern down some to fit her size :) Thank you for your reply.
ReplyDeleteOh good! I hope the little version works out too :)
DeleteCREUZA. 13-10-2012.MORA EM RIBEIRAO PRETO ,SP ADORO ARTESANATO.
ReplyDeleteSEJA EM MADEIRA,TECIDO ME APAIXONO POR TUDO.
Thank you for the pattern. I have linked to it on my blog - http://alittlebirdmademe.wordpress.com/2013/06/14/20-beach-or-weekend-bag-free-tutorials/
ReplyDeleteHi! I love everything on this blog! Anyway, what are the finished dimensions of this bag?
ReplyDeleteI'll try to get them to you tomorrow!
DeleteI just finished my first bag. I used material from my mother in law; who recently passed away and made a bag for my sister in law. She remembers the fabric and it will be a nice sentiment for her and I enjoyed making it. Now; back at it and one for me.
ReplyDeleteThat's so great to hear! Made my day :)
DeleteHaving lots of trouble with the bottom part - my angles aren't lining up nicely with the main fabric. I'm afraid it's going to be bunched up. :-(
ReplyDelete