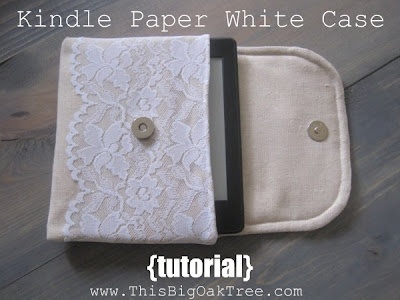
Kindle Paper White Case {tutorial}
It's official, I've been shoved into the next generation of readers. It happened Christmas morning when my husband grabbed a somewhat peculiar gift out from under the tree and handed it to me, a look of incertitude on his face. I had just told him days before how much I enjoyed reading from books, particularly the ability to put a book marker in it and see just how much I have left, obviously unattainable with an electrical devise. So I ripped off the wrapping to reveal an Amazon box and I knew from that very box what I was about to find inside. My thoughts swirling around in my head...do I act overjoyed? Disappointed? Bewildered? Somehow I think I managed all of the above. My husband, feeling like a true failure, says "I think you'll be surprised at how much you like it!" Well all I can say is...(and honey you might want to remember this one cause you may never hear it again ;) he.was.right. I love it. This devise that is putting book stores out of business. This devise that doesn't have a beautiful cover with lovely colors and a wonderful typeface to draw my in. This devise that...that...is so lightweight, compact, back lit in the dark, tells me exactly how long I have until the end of the chapter & the book, allows me to read in bed on my side without awkward hand positions or cramping, remembers what page I was on and best of all defines words for me on the spot! My husband said "You'll never want to pick up a book again." How could I?!? Oh Kindle Paper White...you've got me.
So I figured if I was going to keep it I might as well make a cute case for it right?
Here's What You'll Need:
1/4 yard of fabric
1/4 yard of cotton batting like for quilting
Coordinating thread
Sewing machine
Ruler
Fabric marker
Iron/ironing board
Magnetic fastener
Start by cutting your fabric:
2 pieces from the main fabric 8 1/4" wide by 13" long
1 piece from the cotton batting 8 1/4" wide by 13" long
Lay the batting on top of the WRONG side of one of the fabric piece. Set aside other fabric piece until a bit later.
Place the Kindle down around the middle of the fabric and fold over the fabric and batting until the Kindle is covered with an extra 1/2" beyond it.
Like so.
Cut a slit into the batting and fabric where the folded edge ends, a little more than 1/4" in...yes, I sew barefooted.
Cut the rest off down to the end like so.
Use something round to mark a rounded edge on what will become the flap. Cut on the mark. You'll need to do this to the other piece of fabric too.
I added lace to mine so I had to attach it here.
Stitch all the way around the fabric and batting 1/8" seam allowance.
Add your magnetic fastener. The directions are on the package but you can see photos here.
Place this piece where you want the fastener to go and mark the slits onto the fabric.
Place a pin at the top of the marks and use a seam ripper to open the slits.
Put the fastener through the holes. I like to use Fray check around the holes to make sure they don't come open later.
Place this piece on.
Push the peg parts down.
Repeat these steps of placing the other fastener. Remember that the other fastener is going to be placed on the other/inner fabric piece on the RIGHT side of the fabric. Make sure you put the fasteners on so that they line up correctly in the center.
Once you have your fasteners on you will place the fabric RIGHT sides together. Pin all the way around leaving an opening in the bottom.
Stitch a 1/4" seam all the way around except the opening in the bottom.
Turn the case RIGHT side out through the hole. Push out the corners. Iron.
Top stitch the opening closed.
Fold up the case body RIGHT sides together.
Stitch the sides closed. Top stitch around the flap if desired. It's actually easier if you do this before stitching up the body. Once that's done turn the body RIGHT side out and iron. And there you have it, a safe place for your new love.
Happy Reading & Crafting!


This is so pretty with the lace - I have made one for my iPad but I think it needs some prettying up after seeing your creation!
ReplyDeleteThanks Lisa! I had just received the lace from my husband's grandmother so the timing was opportune :)
DeleteHi, Amy
ReplyDeleteI love this tutorial. I'll have to try it out and make one. I found your lovely blog on Shaken Together link party. Enjoyed looking around and I am a new follower. Love for you to pop over www.homesweetbutterfly.com. Have a great week.
Vanessa
Thanks Vanessa! Cute blog...new follower here or rather there! :)
Deleteah what a CUTE case. i love lace! you are so creative...i wish i was able to do more crafts like this!
ReplyDeletenew follower :)
www.thebechtholts.blogspot.com