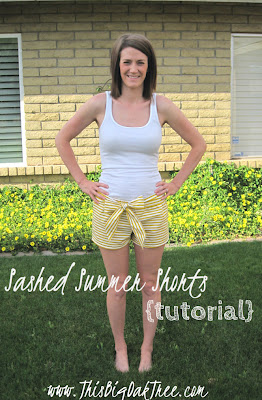
One Yard Summer Shorts {tutorial}
I felt like a challenge today and I only had one yard of fabric to do it in so I took a stab at shorts!
To my joy & surprise they turned out!
Here's how I did it:
1 yard of fabric (for a size 2 short)
scissors
paper
pen
pins
sewing machine/serger
measuring tape
elastic band
old pair of shorts to go off of
I started out with an old pair of shorts that have seen better days and I cut them up. This gave me the general shape and sizes needed for the shorts. Remember that the cut up pair doesn't account for folding/ironing, seaming, etc. You'll want to add extra width and length in those areas.
I created a paper template out of the cut up shorts, again, adding extra to the top and bottom as well as the seams.
Here's what they look like cut out.
Then I lined up the back two pieces, placing the fabric RIGHT sides together and stitched just down the curve. Repeat with the front two sides.
I used a serger so the seam looks like this.
And here they are again...just wanted to be thorough ;)
Then with the WRONG side facing down open up the leg portion as shown above.
Place the other piece RIGHT sides together on top lining up the leg seam. Here's where I noticed that my front and back pieces weren't the same length so I evened them out.
Stitch a seam down both leg sides (one continuous stitch).
Then I noticed the tops weren't even either so I trimmed off the extra at the top.
I pinned down the sides of the shorts and stitched them.
You can see it coming together!
I turned them right side out and determined how short I wanted them to be. I folded them inward twice and ironed in place.
Then I stitched a seam around both legs.
For the top I ironed down about 1/4" of an inch and then again a little bigger than my elastic band, see below...
I stitched the top down leaving a small opening to slide in the elastic.
This is were you decide how tight you want it to be and cut the elastic accordingly.
Putting a safety pin on one end I pushed the elastic in and around the top.
Once it comes out the other end you can stitch the two ends together and tuck the whole thing up into the top.
Stitch off the opening.
Here's them so far!
To make the sash take two strips of fabric 5 1/2"x 36" and seam them together making it 72" long. Iron in the sides 1/4".
Iron the sash in half and then bring in the corners as shown. Stitch to close.
Line up the shorts on the sash to determine where the bow will go. I like my off to the side a bit.
Pin it to the back and stitch in place.
And there you have it!
If you've got questions just ask!
Happy Crafting!


These are super cute!
ReplyDeleteLove the yellow stripes, cute idea!
ReplyDeleteSuper cute shorts, I love the color
ReplyDeleteThese are super cute! The belt really finishes them off. If you're looking for another place to share your sewing creations, check out Etcetorize (http://etcetorize.blogspot.ca/2012/05/make-it-great-monday.html). Party just started and we'd love to have you join~
ReplyDeleteAdorable! I might have to try it:)
ReplyDeleteHi Amy, I'm Connie a new GFC friend. I would love it if you stop by http://hotflashncraftn.blogspot.com/, and be my friend, too. These shorts are so adorable, even without the sash. Thank you for sharing, I think I'll make a pair.
ReplyDeleteVery cute, the bow is perfect.
ReplyDeleteLove the bow! They turned out great.
ReplyDeletexoxo
Heather
So cute!! Great tutorial, I'd love to have you share this on my weekend linky party going on now.
ReplyDeleteThese are seriously adorable!!! Love that the tutorial looks so easy too! Thanks so much for sharing and I am a new follower! Hope you have a great weekend!
ReplyDeleteMichelle
www.delicateconstruction.com
Amy! Those shorts are amazing! I love the fabric that you used! Angie xo
ReplyDeleteCute! but just fyi.. shorts/pants are generally a little taller in the back and longer to make room for your butt :) haha im sure its not a problem here! but for those of us who dont wear a size two... its looks normal when you put it on dont worry!
ReplyDeleteHaha! Thanks Laura! I used an old pair of shorts to get the template but I agree I would like them a bit longer in the back going forward.
DeleteThese are SO adorable!!! Nice job!
ReplyDeleteAwesome shorts! I love the bow. The look really comfy.:)
ReplyDeleteThose are so cute! I wish I had the legs for these! :) We would love for you to come share it at our weekly link party and enter to win a $50 gift card to Mikarose Clothing!
ReplyDeletehttp://www.sixsistersstuff.com/2012/05/strut-your-stuff-saturday-link-party_11.html
Love,
The Sisters
These are absolutely adorable! Not sure a yard of fabric would make shorts for me that I could wear in public, ha ha, but you can rock those without a doubt!! thanks for sharing this at the {what's shakin' link party}!!
ReplyDeleteLove the shorts! Question: is that just cotton fabric or some kind of knit?? Love the bow!!
ReplyDeleteBrandy
Hi Brandy, These are just made of good ol' cotton fabric but a cotton knit would be very comfy! Thanks for stopping by! Amy
DeleteCan you make me a pair, if I pay you! (:
ReplyDeleteAnouchka Sofia (:
Hi Anouchka Sofia, Thanks for checking out my blog! I'm currently not taking any orders for items at this time. I will revisit the idea in about a month. If you're still interested then please let me know :) Thanks!
DeleteGah! These are so cute!!!!
ReplyDeleteThese shorts are so cute, I love the bow :)
ReplyDeleteGreat...just in time for school vacations, here in Venezuela the school year is almost done and we are having a trip to Florida.... so i think i will need a bunch of these in differents colors and prints..... with their matching small versions for my 4 years old daughter!!!!
ReplyDelete